

Installation Guidelines

Every North Air window is a custom-built, high-performance product. It is critical that your windows are installed
properly in order to enjoy all the benefits designed into your window.
Here are some guidelines for a successful installation. However, if you have any questions about the skills, tools or
method required to install your window, please contact your North Star dealer before proceeding.
- Set unit into properly prepared opening, ensuring unit has sufficient space for proper shimming and insulation.
- Do not remove center strap on double-hung and tilt slider windows until securely installed in opening.
- Level sill, shim at corners, under each mullion, at horizontal and vertical mid points and at approximately 16-inch intervals. Ensure unit is level, plumb and square prior to anchoring through window jambs, at shim locations.
- Do not anchor unit through jamb extensions.
- Loosely fill cavity between frame and opening with fiber insulation or low-expanding foam being careful not to overpack and overfill.
- Check for consistent clearance between sash and frame.
- In masonry installations, leave 1/4-inch clearance between the window and the masonry to prevent window-related binding problems caused by expansion or contraction.
- For siding applications, install a drip cap above the window.
- Check unit operation before applying interior trim, exterior brick or siding.
- Apply a quality exterior-grade caulking to the exterior frame cavity between window and opening, ensuring that all voids are sealed for protection from the weathering elements.
Improper Installation may void warranty.
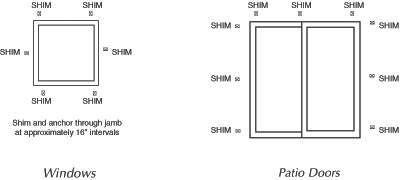
Shimming locations in accordance with CSA-A440 standards.
For more detailed installation instructions please contact a North Air dealer
Note: Windows are not designed to carry any bearing load.
WARNING: Screens are intended to keep out insects. They are not designed to restrain children.